Christmas crackers are a beloved tradition that brings joy and excitement to festive celebrations. There’s something magical about that satisfying snap, the paper crown perched wonkily on your head, and the groan-worthy joke that follows. But here’s the thing: shop-bought crackers often disappoint with flimsy construction and throwaway gifts nobody actually wants.
I’ve been making my own Christmas crackers for years now, and I can honestly say it’s transformed our holiday gatherings. The look on my guests’ faces when they discover a thoughtful, personalised gift instead of another plastic fish is absolutely priceless. Plus, once you understand the basics, it’s surprisingly straightforward.
In this guide, I’ll walk you through everything you need to know to create beautiful, professional-looking crackers that actually work. No more embarrassing duds that refuse to snap.
Why Make Your Own Christmas Crackers?
Before we dive into the how-to, let’s talk about why this is worth your time.
First, homemade crackers are significantly more cost-effective than premium options. A set of six luxury Christmas crackers from a high-street retailer can easily run you £30-50. But when you make your own, you can create the same quality for roughly £10-12.
Second, personalisation. This is the real game-changer. You can tailor each cracker to the specific person pulling it. Imagine filling your mother’s cracker with her favourite tea bags, or including a meaningful photo in your partner’s. These small touches create moments that shop-bought crackers simply cannot match.
Third, sustainability. Most commercial crackers contain non-recyclable materials, excessive plastic, and gifts destined straight for the bin. When you make your own, you control every element and can choose eco-friendly options throughout.
Understanding How Christmas Crackers Work
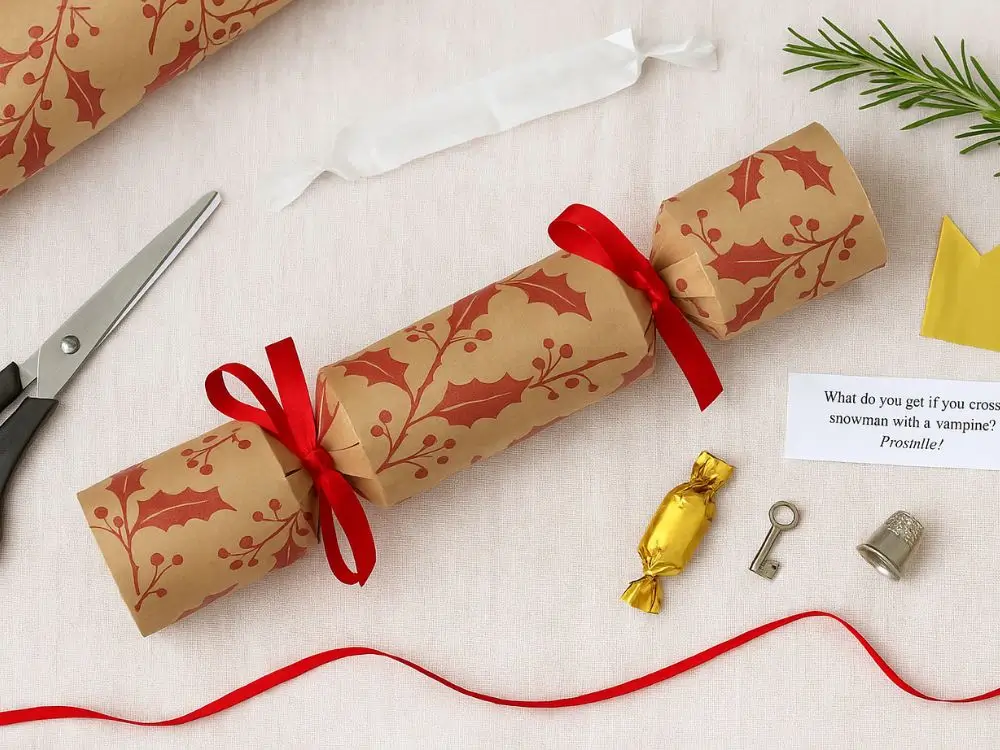
The key to a successful cracker lies in understanding its construction. At its core, a cracker is deceptively simple: a cardboard tube wrapped in decorative paper with a snap strip running through it.
The snap strip contains a small amount of silver fulminate on friction-sensitive card. When two people pull the ends, this creates the satisfying pop we all love. The trick is positioning this strip correctly so it has enough overhang to generate friction when pulled.
Most homemade cracker failures stem from three issues: the snap strip being tucked entirely inside the paper, insufficient gaps between tubes, or paper that’s too thick to tear cleanly.
Essential Materials You’ll Need
Let me break down exactly what you’ll need to source. I’ve made enough batches to know which materials work and which don’t.
Core Structure:
- Cardboard tubes from toilet rolls or kitchen roll (one per cracker)
- If using kitchen roll tubes, cut them into 10-12 cm sections
Paper:
- Wrapping paper or crepe paper, 30 x 20 cm per cracker
- Aim for 70-90 gsm weight – anything thinner tears during assembly, anything thicker won’t snap properly
- Avoid heavily laminated or foiled papers unless you’re making quiet crackers
The Mechanism:
- Cracker snaps marked UKCA or CE compliant
- These typically come in packs of 20-50 and cost around £3-5
- Buy from reputable craft suppliers – cheap snaps have a high failure rate
Assembly Materials:
- Ribbon or twine, approximately 60 cm per cracker
- Double-sided tape or PVA glue
- Scissors and a ruler
Contents:
- Paper crowns (purchase ready-made or fold your own from tissue paper)
- Small gifts appropriate to each recipient
- Jokes or riddles printed on small paper slips
When you design your crackers, think about your overall theme. Are you going rustic with kraft paper and twine? Or elegant with metallic paper and velvet ribbon? Your material choices should reflect this vision.
Step-by-Step Construction Method
Right, let’s get into the actual making process. I’ll walk you through the method I’ve refined over dozens of batches.
Step 1: Prepare Your Workspace
Set up an assembly line system. This isn’t just about organisation – it genuinely speeds up the process and improves consistency. Lay out all your materials within easy reach. Cut all your paper to size first. Trust me, stopping mid-assembly to cut more paper breaks your flow and leads to mistakes.
Step 2: Cut and Position Paper
Trim your wrapping paper to exactly 30 x 20 cm. Place it face-down on your work surface. Run a strip of double-sided tape along one long edge. This makes sealing much cleaner than fumbling with glue mid-roll.
Step 3: Place the Snap Strip
This is critical. Lay your snap strip horizontally across the paper’s centre line. The absolute key here: ensure 2-3 cm extends beyond each short edge. Many beginners tuck the entire strip inside, which prevents proper friction when pulled.
Tack the snap at each end with a tiny piece of tape. This stops it shifting during rolling.
Step 4: Add Your Tube
Centre your 10-12 cm cardboard tube on the paper. Roll the paper snugly around the tube – not too tight, not too loose. Seal along the taped edge to form a neat cylinder.
Step 5: Create the First Waist
Pinch the paper approximately 2-2.5 cm from one end of the tube. This distance matters. Too close and the paper tears when tying. Too far and you lose the classic cracker silhouette.
Tie firmly with ribbon. I wrap twice before knotting for extra security.
Step 6: Fill Your Cracker
Through the open end, carefully insert your paper crown (rolled tightly), your printed joke, and your chosen gift. Keep everything centred so the weight distributes evenly when pulled.
One lesson I learned the hard way: don’t overstuff. If you can’t easily tie the second end, you’ve added too much.
Step 7: Complete the Second Waist
Pinch and tie the remaining end exactly as you did the first. Trim ribbon ends to your preferred length.
Step 8: Final Check and Decoration
Gently tug each side to verify the snap is centred and runs freely. Add any final decorative touches – a sprig of rosemary, a dried orange slice, or a handwritten name tag.
Sourcing Quality Supplies
The quality of your materials directly impacts your final results. After years of experimentation, I’ve learned that investing in reliable supplies saves both time and frustration.
Snap Strips
For snap strips, I recommend shopping at Hobbycraft or specialist online retailers like The Cracker Company and JollyCracker. These suppliers consistently deliver reliable snaps with minimal failure rates. Steer clear of ultra-cheap packs from marketplace sellers—I’ve experienced failure rates exceeding 50% with budget options, which can ruin an entire batch.
Bulk Orders
If you’re creating crackers in bulk for large gatherings or events (24+ crackers), consider wholesale suppliers. Many specialist retailers, including JollyCracker, offer snap strips, pre-cut papers, and crowns in bulk quantities at significant discounts. This approach becomes increasingly cost-effective as your order size grows.
Paper Selection
For paper, I’ve achieved excellent results with both dedicated craft papers and carefully selected wrapping paper from shops like Paperchase or John Lewis. Pro tip: always test a sample before committing to a full batch—this simple step prevents disappointing results and wasted materials.
Gift Ideas That Actually Impress
The contents make or break homemade crackers. Here’s what actually works:
For Adults:
- Miniature spirits (check size restrictions)
- Quality tea bags or coffee sachets
- Seed packets for keen gardeners
- Lottery scratch cards
- Metal bottle openers or wine accessories
- Small beauty products like lip balm or hand cream
For Children:
- Mini crayons or pencils
- Small wooden toys
- Stickers or temporary tattoos
- Puzzle erasers
- Hair accessories
For Everyone:
- Chocolates or quality sweets
- Paper fortune tellers (remember those?)
- Interesting facts tailored to each person
- Mini notebooks
When selecting gifts, remember the 3 cm rule: nothing should exceed 3 cm on its shortest dimension, or you’ll struggle with bulging.
Common Problems and Solutions
Even with perfect instructions, issues arise. Here’s how to troubleshoot:
The snap doesn’t work: Nine times out of ten, this means the strip wasn’t positioned correctly. Check both ends protrude by at least 2 cm. Also ensure you left proper gaps if using multiple tube sections.
Paper tears during assembly: Your paper is likely too thin or you’re gripping too tightly. Move up to 80-90 gsm paper and handle more gently during rolling.
Crackers look messy or uneven: This comes down to practice. Use a ruler to keep tubes aligned whilst rolling. Work on a flat surface. Don’t rush.
Gifts fall out before pulling: Tie the ends more securely, or use a small piece of washi tape inside the tube opening to create a subtle lip.
Making Christmas Crackers UK Style
In the UK, Christmas crackers UK traditions run deep. The Victorian-era invention has become as essential to British Christmas dinner as turkey and Brussels sprouts. When making authentic British-style crackers, certain elements matter.
Traditional colours lean toward red, green, and gold. The jokes should be spectacularly awful – that’s part of the charm. And the paper crown is non-negotiable. Some things about British Christmas are simply sacred.
UK regulations for cracker snaps are strict. Always purchase UKCA or CE marked products. Store them in a cool, dry place away from heat sources. When pulling crackers, especially with children present, always supervise and ensure everyone pulls away from their face.
Scaling Up Production
Planning to make crackers for a large gathering? Here’s how to scale efficiently.
Batch your tasks. Don’t make one cracker start to finish, then start the next. Instead, cut all paper first. Then position all snaps. Then roll all tubes. This assembly line approach can triple your output.
For really large batches (30+), consider recruiting help. I’ve turned cracker-making into a festive activity with friends, complete with mulled wine. Everyone takes responsibility for one stage, and we work through dozens in an afternoon.
The Environmental Angle
Traditional crackers generate significant waste. When making your own, you can dramatically reduce environmental impact.
Choose FSC-certified paper. Avoid glitter and non-recyclable metallic finishes. Use natural twine instead of synthetic ribbon. Select gifts that are either consumable, recyclable, or genuinely useful.
For the truly committed, you can even make reusable fabric crackers. These use Velcro or buttons instead of snaps and can be refilled year after year.
Final Thoughts on Homemade Christmas Crackers
Making your own Christmas crackers transforms a throwaway party favour into something meaningful. Yes, it requires time investment upfront. But the satisfaction of creating something with your own hands, tailored specifically for the people you love, is genuinely special.
Start small. Make a set of six for your immediate family this year. Learn what works and what doesn’t. Refine your technique. Before you know it, you’ll be the person everyone asks to make their crackers.
The beauty of handmade crackers isn’t just in the finished product. It’s in the process itself – the quiet afternoon spent crafting, the anticipation of seeing each person’s reaction, the pride in creating something that adds real joy to your celebration.
This festive season, give it a go. Your Christmas table deserves better than mass-produced crackers filled with plastic tat. And honestly? Once you’ve heard that satisfying snap from a cracker you made yourself, shop-bought versions will never feel quite the same.